Call Us
+86 136 6007 9809
Call Us
+86 136 6007 9809
Nov. 19, 2024
Design Details and Pilot Program Solutions for Welded Screw and Nut Fasteners
Welded fasteners in automobiles are mainly used to connect sheet metal parts and other components. The body-in-white, as a load-bearing carrier, has many studs, bolts, and nuts welded on it to provide mounting points for the interior, electrical wiring harnesses, brake lines, etc.; the chassis subframe is also welded with many studs and nuts to provide mounting points for other assemblies. In practice, welding fasteners welding quality is often poor, the position of the degree of unqualified, torsion torque does not meet the standard, and other issues in welding fastener design and testing to meet the details of the requirements and measures to ensure that.
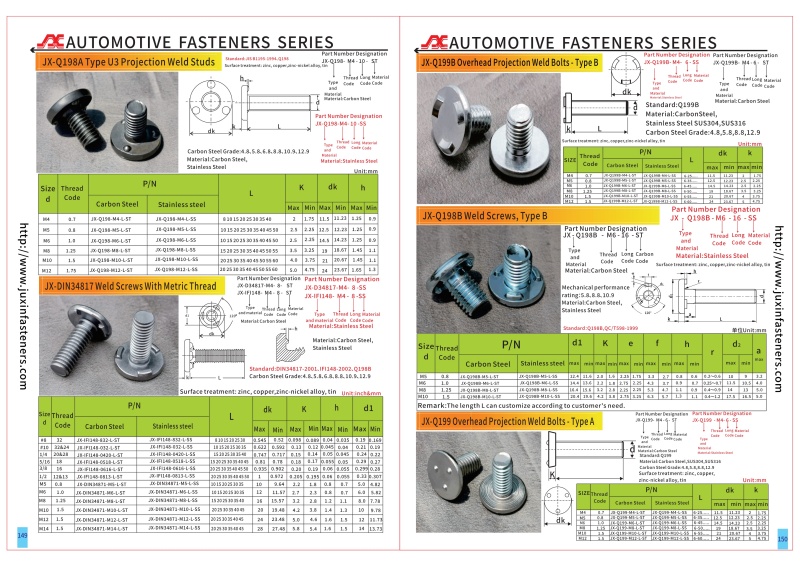
1. Welding fasteners product categories see the following table, can be found in the automotive standard parts manual size and technical details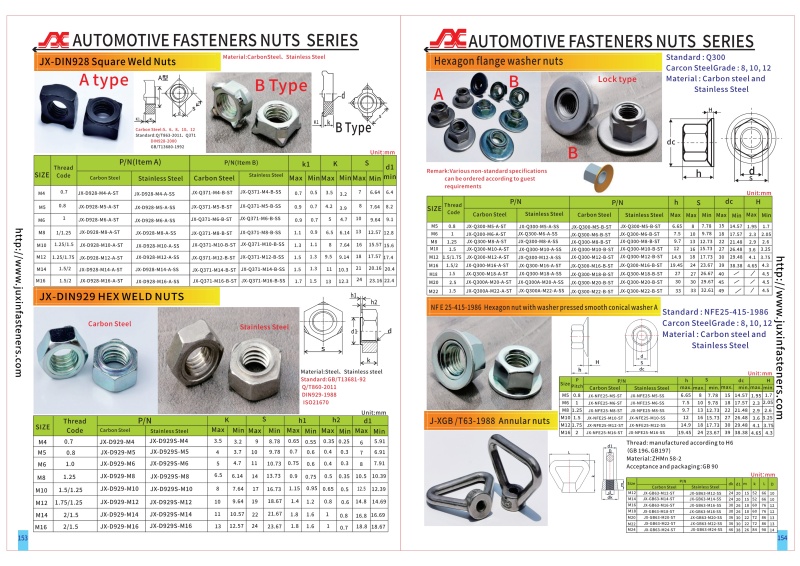
#DIN 32501-1 Studs For Stud Welding With Tip Ignition; Threaded Bolt
#Carbon steel Overhead Projection Weld Bolts
#Overhead Projection Weld Bolts - Type B
#Carbon steel Welding Screws For Plastic
#DIN34817 Weld Screws With Metric Thread
#IFI 148 (U3)Type U3 Projection Weld Studs
#Carbon steel Type UR Projection Weld Studs
#Type UC4 Projection Weld Studs
#Stainless steel Type T3 Projection Weld Studs
#Heavy Duty Type US3 Projection Welding Studs
#Carbon Steel Flat Round Head With Rings On Undertake Surface Welding Screws
#Carbon Steel Type TUS3 Projection Weld Studs
#Stainless steel Type TD Projection Weld Studs
#Carbon steel Type TD Projection Weld Studs
#Aluminum Type TD Projection Weld Studs
DIN929 Steel Hex Weld Nuts
Metric Steel Hex Weld Nuts
Stainless Steel Hex Weld Nuts
Metric Stainless Steel Hex Weld Nuts
Steel Screw-Locking Hex Weld Nuts
DIN928 Square Weld Nuts
Steel Low-Profile Narrow-Base Weld Nuts
Stainless Steel Low-Profile Narrow-Base Weld Nuts with Projections
Stainless Steel Low-Profile Narrow-Base Weld Nuts
Steel Low-Profile Narrow-Base Weld Nuts with Projections
Low-Profile Narrow-Base Double Weld Nuts
Steel Offset-Barrel Narrow-Base Weld Nuts
Stainless Steel Offset-Barrel Narrow-Base Weld Nuts
Steel Offset-Barrel Narrow-Base Weld Nuts with Projection
Steel Narrow-Base Weld Nuts
Metric Steel Narrow-Base Weld Nuts
Steel Narrow-Base Weld Nuts with Projections
Steel Round-Base Weld Nuts
Metric Steel Round-Base Weld Nuts
Stainless Steel Round-Base Weld Nuts
Round-Base Weld Nuts with Projections
Aligning Weld Nuts
Metric Aligning Weld Nuts
Steel Corner Weld Nuts
Stainless Steel Corner Weld Nuts
Screw-Mount Nuts
JIS B 1200 Hexagon Weld Nuts With Flange
Square Weld Nuts
Hexagon Weld Nuts
ISO 21670 Hexagon Weld Nuts With Flange
Square Weld Nuts For Fixing The Safety Belt Devices Of Vehicle
Square Nuts For Resistance Projection Welding
T-Style Weld Nut - Type 2A and 2B
Hexagon Weld Nut - Type 1A And Type 1B
T-Style Weld Nuts - Type 1A and 1B
Threaded Studs With Flange For Short-Cycle Drawn Arc Stud Welding - IS Type Internal Screw Stud
Weld Studs For Capacitor Discharge Welding - Type IT
Spot welding nut (ANSI/ASME/IFI)
Hexagon weld nut with flange
2. Welding fasteners product size and shape tolerance requirements and guarantee measures
(1) Welded fasteners mostly use coarse thread. The welded bolt thread tolerance of 6g and the welded nut thread tolerance of 6G should be consistent with ISO 724 “common thread basic size” and ISO 965 “common thread tolerance” provisions.
(2) When the welded fasteners are coated after the process, the thread diameter is four times the coating thickness t, chassis, and other heavy corrosion areas of the coating h thickness of 15um-35um, the diameter of the size of the amount of change will be very large.
(3) According to the ISO 965 “Common Thread Tolerance” standard, any point on the actual contour of the thread should not exceed the maximum solid tooth shape determined by the tolerance position H or h. So that the thread cannot exceed the dimension line of the primary tooth type after thread coating, there are two guarantee measures for internal threads:
a. Use a larger clearance with a non-standard internal thread tolerance of 6E.
b, in the thread coated with NYCOTE adhesive, the electrophoretic coating is the thread will not adhere to the electrophoretic layer. For external threads to ensure mechanical strength before coating can be used, 6e or 6f tolerance.
(4) Welded joint size and shape: the same bolt or nut welded joints should be the same shape, circumferential distribution, and welded joint height difference ≤ 0.15mm.
3. Mechanical properties of welded fasteners requirements
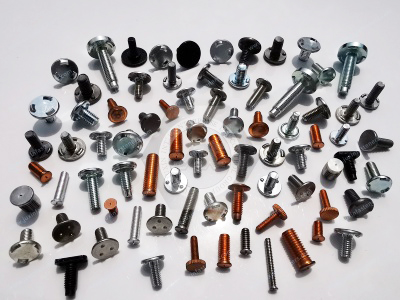
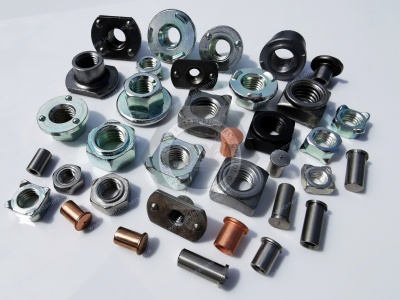
(1) The mechanical properties of welded bolts should be consistent with ISO 898-1 "fasteners mechanical properties of bolts, screws and studs" provisions.
(2) welded nuts to ensure that the load requirements are in line with the provisions of the corresponding product standards; the rest in line with the provisions of ISO 898-2 "fasteners mechanical properties of nuts" (tempering treatment of the hardness of the nut hardness of the provisions of the hardness of not more than 300HV30).
- Performance class 8 nuts: hardness of about 248-320 HV.
- Performance class 10 nuts: Hardness approximately 272-363 HV.
- Performance class 12 nuts: Hardness approx. 304-363 HV.
(3) When evaluating weld nuts in conjunction with bolts, it is essential to consider that their guaranteed load is 10% higher than the bolt's, preventing the internal threads from being pulled out.
4) Welded studs and welded bolts have lower performance levels, fewer types, and lower corrosion protection ratings, so they should be considered different from ordinary bolts when selected for use.
4. Weld fastener materials and surface treatment
Welded fastener materials with a carbon content of less than 0.25%, with weldable steel, shall not use easy-to-cut steel. Bolt stud commonly used material grades: SWRCH16A, SWRCH22A, 10B21, 20MnTiB. Nuts commonly used material grades: SWRCH18A, 10B21, 20MnTiB, SAE1010 SWRCH22A, the surface treatment of anti-rust oil or galvanized passivation, or zinc-nickel alloy.
5. Welding fasteners with welding plate thickness and hole diameter
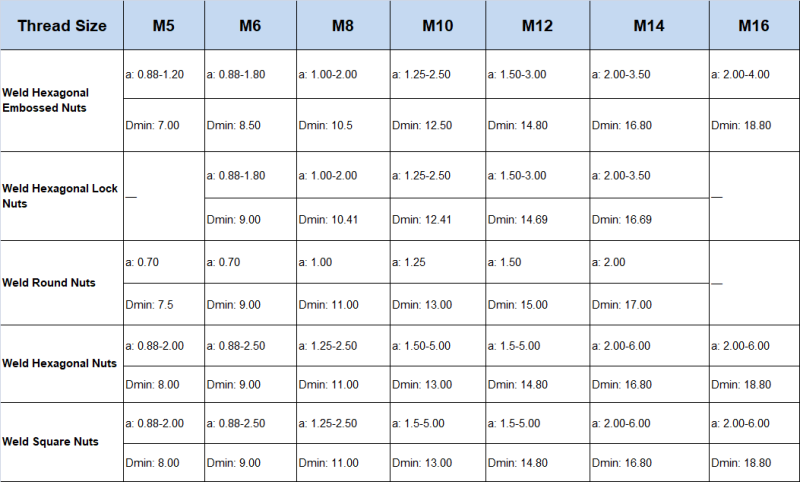
(1) The connection plate thickness and hole diameter of the bearing surface convex welding bolts are the same as those of the welding square nuts, and the plate thickness of the end surface convex welding bolts refers to the nuts.
(2) The designer selects the corresponding form of nut according to the specific use requirements and the material and size of the steel plate at the connection.
Weld Hexagonal Embossed Nuts: Welding Plate Thickness and Hole Diameter
Weld Hexagonal Nuts: Welding Plate Thickness and Hole Diameter
Weld Square Nuts: Welding Plate Thickness and Hole Diameter
6. Welded fasteners opponent parts - multi-layer sheet metal parts hole design principles
(1) Sheet metal parts convex welding nut bottom hole and over-hole size specification design requirements

Special considerations:
a. From the structural design, to avoid as much as possible multi-layer plate welding, each additional layer of the plate should have an over-hole size because of the size and location of the degree of matching to make the hole diameter larger, resulting in an insufficient amount of bolt overlap.
b. When using washers to cover large aperture diameters, in addition to considering the amount of overlap, verify the shear stress and support stiffness of the overhanging washers so that the bolt connection is adequate.
(2) Sheet metal parts convex welding bolt bottom hole and over-hole size specification design requirements
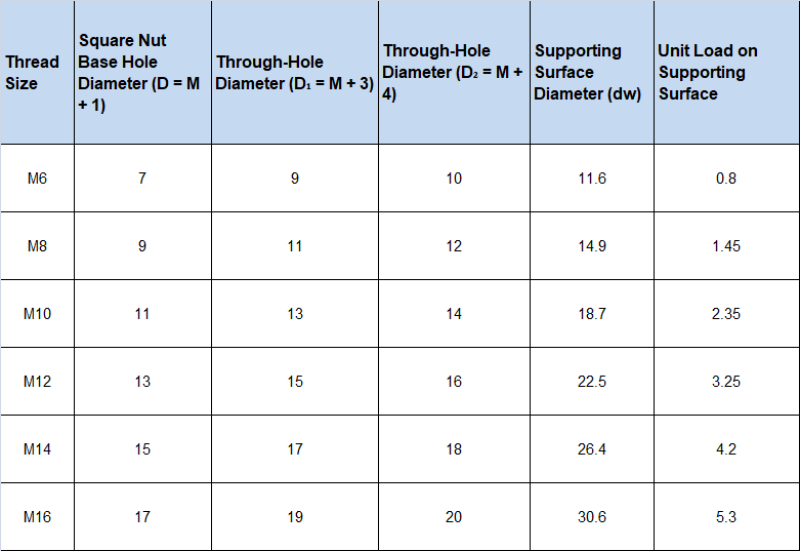
Special considerations:
a. Do not use welded studs for large bolts. The maximum M12 in the automotive standard manual is M16, while welded studs have M16.
b. Be sure to ensure that the bottom hole D = M + 0.2 so that the transition circle under the bolt's head does not interfere with the steel plate and so that false torque generation is avoided.
c. From the structural design, try to avoid multi-layer plate welding. Each additional layer of the plate should increase the size of the hole because of the size and location of the degree of matching, resulting in an insufficient amount of bolt overlap.
d. The effective bolt connection uses washers to cover the large diameter of the hole. The amount of overlap is also considered to verify the shear stress of the suspended washers and support stiffness.
7. Requirements and control of the clearance between the end face of the convex welded fastener and the steel plate of sheet metal parts
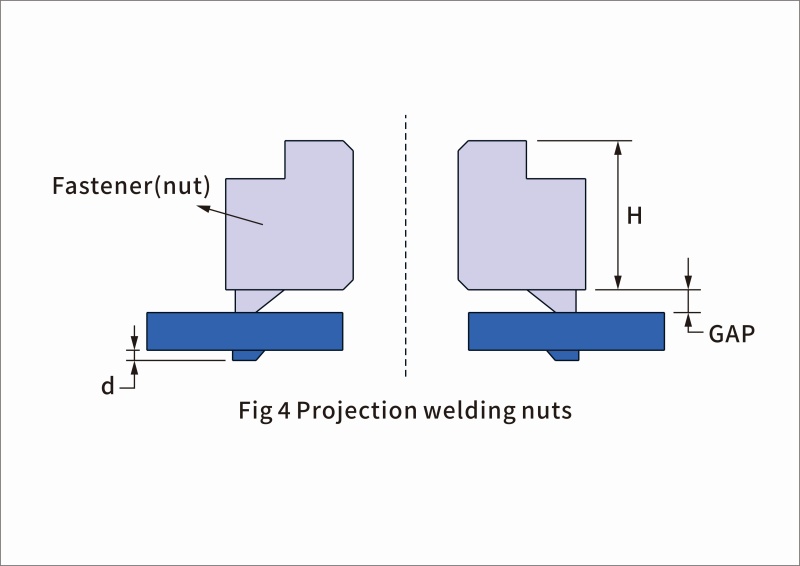
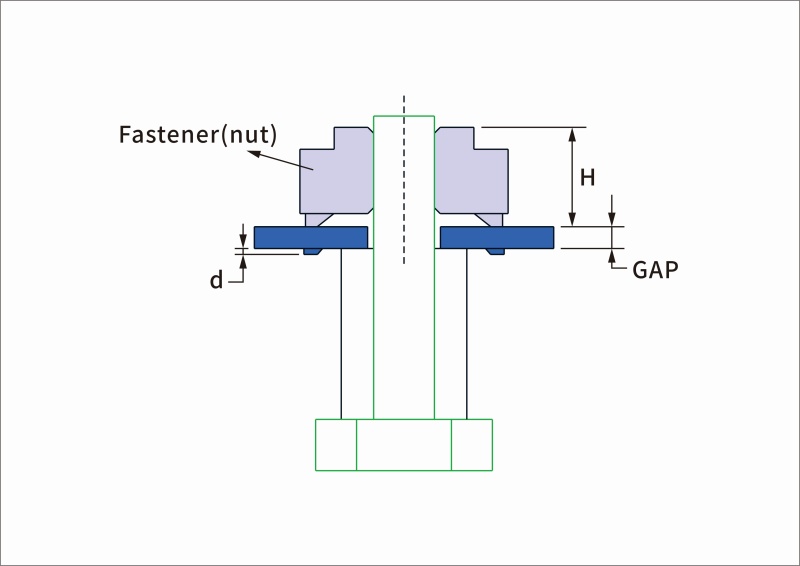
(1) The gap between welded fasteners (except for annular sealing bumps) and the surface of the steel plate after projection welding (as shown in the figure) shall not exceed 0.3mm or 30% of the height of the welding foot of the fastener before projection welding (whichever is smaller).
(2) The thickness dimension H of welded fasteners after projection welding shall not exceed 90% of the original dimension.
(3) Welding standard parts after projection welding, the back of the steel plate raised height d shall be less than 0.2mm.
(4) The connection vice of the bolt axial force is high. This structure should be avoided as much as possible.
5) If this structure is chosen, pay attention to the following 3 points:
a. torque calculation should consider the torque consumption required to eliminate the gap
b. Consider the structural stiffness of the welded steel plate and the chance of plastic deformation.
c. Negotiate with the supplier for a smaller weld gap.
8. Coaxiality of weld nuts and sheet metal parts after projection welding
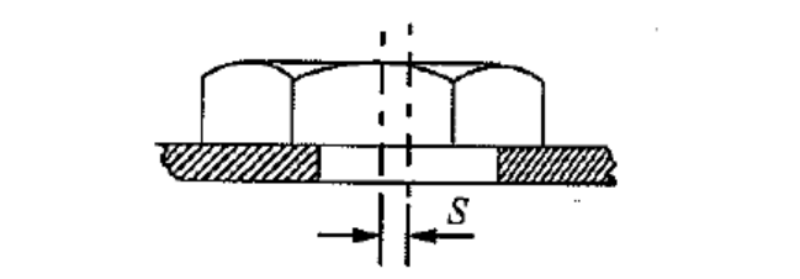
For specifications less than or equal to M5 nuts, it is recommended that S ≤ 0.2mm; for specifications greater than or equal to M6 nuts, it is recommended that S ≥ 0.5mm; for round head welded nuts, it is recommended that ≤ 0.2mm.
A new energy sector has occurred, coaxially is not controlled, the surface coating of the bolt Dacromet scraped off, and the test car rust cases. If the value of S is too large, the bolt threads will be slip buckled, generating false torque or not screwed in.
9. Torque test of welded fasteners
The welded fastener torque test is divided into a non-destructive test and a destructive test; both test methods are the same: the non-destructive test is before reaching the minimum specified torque, and the connection point is not sheared or torn.
It is not recommended to use welded structures for nuts and bolts with M14 and above specifications; if necessary, the test will determine the torque value.
10. Extrusion test of welded fasteners
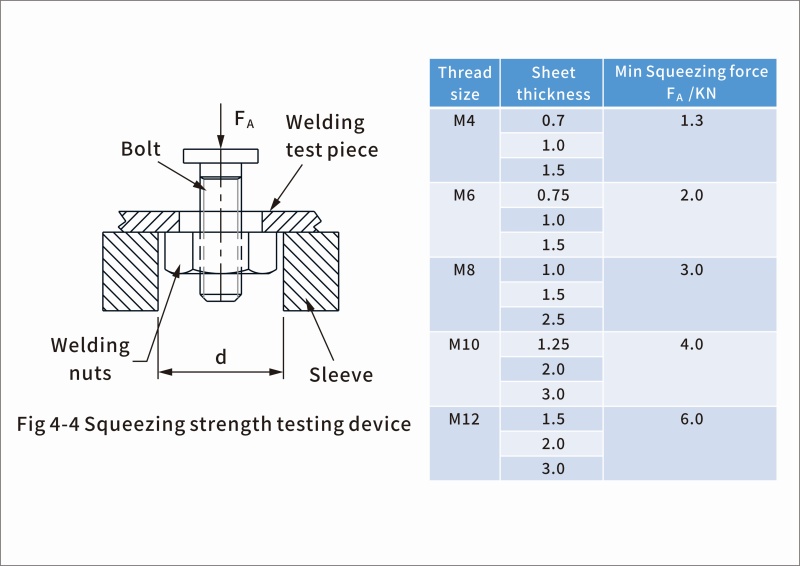
With the appropriate testing equipment, the test device is needed to measure the connection point, apply force until the connection point separation, and test the extrusion strength, as shown in the figure. The measured FA must meet the minimum extrusion force and fracture surface assessment to confirm the integrity of the weld and the size and material of the test device sleeve to meet the requirements.
Email:adelajonly@gmail.com
https://www.juxinfasteners.com/weld-screws-nuts/
WhatsApp:+86 13660079809
Contact Us
Tel.:
+86 020 8621 0320
+86 020 3121 6067
Technical Support:
Navigation
SEND INQUIREY